☁️ DIY Cloud Music Box – Sew a Dreamy Baby Sleep Cloud
- 3. Nov. 2025
- 5 Min. Lesezeit
Aktualisiert: 7. Feb.
An easy sewing tutorial for a soft cloud-shaped baby music box – the sweetest handmade gift for newborns and baby showers

There’s hardly anything more beautiful than creating something with your own hands – especially when it’s meant for a little one. In this easy DIY cloud music box sewing tutorial, you’ll learn how to make a soft, cloud-shaped baby music box that brings calm, warmth and a sense of security to any nursery.
It gently hums a lullaby while watching over your baby – soft, protective and lovingly sewn. A handmade baby gift that can become a treasured keepsake.
☁️ Why a Cloud Music Box?
The cloud symbolizes lightness and dreams. It reminds us that above the clouds, the sun is always shining, even when the sky is gray.
And that’s what makes this DIY cloud music box for baby so special: it’s a small symbol of hope and security – a reminder that every child sleeps under a lucky star and that bedtime can become a gentle little ritual.
🧵 Materials List for Your DIY Cloud Music Box
You’ll need:
Cotton fabric with dots or stars (for the front)
Soft plush fabric or minky (for the back)
Remnant fabric for the pointed sleeping cap (e.g. jersey or muslin)
Matching sewing thread
Black embroidery thread (for the eyes)
Red fabric paint or textile marker (for the rosy cheeks)
Pull-string music box insert (e.g. “Twinkle Twinkle Little Star” or “Somewhere Over the Rainbow”)
Polyester filling / fiberfill
Pins or fabric clips
Sewing machine
Needle & scissors
With these simple materials you can sew a soft cloud-shaped baby music box – even if you’re still a beginner.
✂️ Pattern & Preparation
Create your pattern: draw a simple cloud shape on paper – about 25 cm (10 inches) wide and 18 cm (7 inches) high. Leave a small opening at the bottom where the music box will later peek out. This gives you an easy cloud music box sewing pattern that you can reuse for future DIY projects.
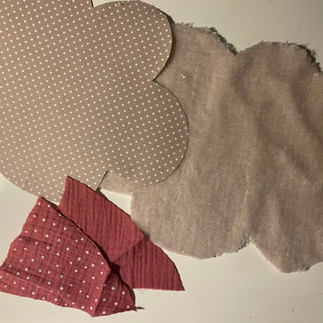
Cutting:
Cut one cloud from cotton fabric (front side). For thinner fabrics, I recommend ironing on a lightweight interfacing so your DIY cloud music box keeps a beautiful, stable shape.
Cut one cloud from plush fabric, mirrored (back side).
Cut the little sleeping cap separately from your remnant fabric.
Now your handmade cloud-shaped baby music box is perfectly prepared for the actual sewing tutorial.


🧵 Step-by-Step Instructions
1. Embroider the Sleeping Face
Use a trick marker to draw two closed, sleeping eyes with eyelashes on the front of the cloud.
Embroider them with black embroidery thread – small, even stitches look especially soft and delicate.
Carefully dab two round rosy cheeks under the eyes with red fabric paint or a textile marker.
If you’re not quite sure where you want the eyes yet, you can also do this step at the very end, just before you start stuffing your cloud music box.
Tip: If you like, you can give your cloud tiny freckles or a small heart – this way your DIY baby music box gets even more personality.
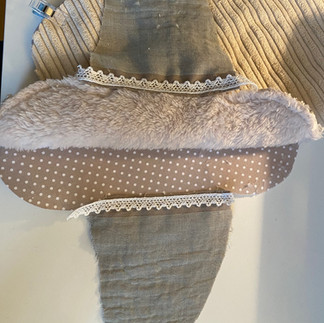
2. Prepare the Little Cap
Place the cap fabric on the cloud, right sides together, and sew each half of the cap to the lower edge of the cloud.
Later, you can sew a small bell or pompom to the tip, or decorate the cap now with a delicate lace trim – for a fairy-tale accent that fits perfectly into a dreamy nursery.
3. Sew the Cloud Together
Place the front and back pieces right sides together and tuck the cap in between them (with the opening facing inward).
Sew all the way around with a seam allowance of about 1 cm – leave an opening at the bottom so you can insert the music box later.
At the top, it’s a good idea to sew in a little cord or ribbon for hanging, so you can place your cloud music box above the crib, on a hook, or on the wall.
Along the curves of the cloud, it’s helpful to snip into the seam allowances slightly before turning – this makes the cloud shape lie softly and evenly after you turn it right side out.


4. Turn & Stuff
Carefully turn the cloud right side out.
Then fill it with soft toy stuffing – not too tight, so it stays wonderfully cuddly and the music box still has enough room in the middle. A light, fluffy filling suits the airy cloud shape perfectly and makes your DIY baby gift extra huggable.
5. Insert the Music Box
Place the music box insert in the center of your cloud and pull the string through the opening at the bottom.
Secure the music box with a few hand stitches so it sits safely inside and doesn’t slip when the string is pulled. This keeps your handmade cloud music box stable and ready for everyday use in the nursery.
6. Close & Finish Your Cloud
Close the turning opening with a ladder stitch (an invisible hand stitch).
Now let your cloud sing a little test lullaby – a gentle pull, a soft tone, and the dream can begin. Your DIY cloud music box for baby is finished and ready to accompany bedtime and naptime.


☁️ Mindful Moment: “Above the Clouds”
While you sew this music box, you can gently remember one of the most beautiful truths: even when the sky is gray – above the clouds, the sun is always shining.
Every seam you sew is like a ray of sunshine made of love, turning into fabric. Maybe soon a tiny heart will be sleeping under your cloud – safe, held and protected.
And every time the melody plays, a little piece of your tenderness begins to sing along. You haven’t just sewn a toy – you’ve created a small ritual for the baby years and a meaningful piece of nursery decor DIY.
☁️ Conclusion: A Heartfelt Project Full of Lightness
This DIY cloud music box is more than just a sewing project – it’s a small meditation on letting go, dreaming and protecting.
It’s a beautiful idea for a handmade baby shower gift, a christening present, or simply a loving detail in the nursery. A hand-sewn baby music box that quietly says: someone took time to stitch love into every little cloud.
More DIY baby projects & meaningful gift ideas
If you’d love to keep creating soft little rituals around your baby’s everyday life, these projects and products go beautifully with your DIY cloud music box:
Sew a DIY wet wipes cover to add a mindful, cosy touch to your changing table – a simple, beginner-friendly sewing tutorial.
Make a DIY hooded towel for kids and wrap bath time in warmth and comfort – a cuddly sewing project that pairs perfectly with your bedtime cloud.
Capture all these tiny milestones in a hand-illustrated baby memory book by FriFri – a tender keepsake album for the first years.
Baby Gift Ideas | Nursery Decor DIY | Handmade Baby Gifts
If you'd like, share your result on Instagram under #frifriDIY or #DreamCloudHandmade – I'd love to see your cloud in the sky of little wonders. ☁️
A hug and see you soon!